
NEX-FS700 with 18-200mm kit zoom.
The NEX-FS700 (US$8000; $8600 with 18-200mm zoom lens) is an E-mount Large-Single-Sensor camcorder with the back end, user interface, and lens mount of the NEX-FS100, but with an entirely new camera section sandwiched between ‘em. The FS700 still takes E-Mount lenses (and other lenses via adapters) and still records AVCHD clips to SDHC cards, Memory Sticks, and an optional 11-hour Flash Memory Unit, but those clips now come from a camera with ND filters, slow-motion options to 960fps, and up to 14 stops of dynamic range with highlight-friendly cine gamma rendering.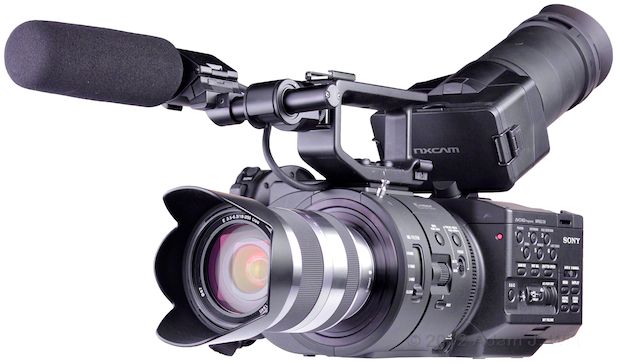
NEX-FS700 head-on.
I characterized the NEX-FS100 as “a short, stubby brick with a Dixie cup glued to one end”. The FS700 uses the same brick, but glues it to a comparatively massive, cylindrical camera section instead:
FS700 compared to FS100, from my
The new camera weighs about a pound more than the older one: 6 lb 12 oz (1680 g) when in the shooting configuration seen above. The body itself is a couple of inches longer and about 3/8” taller, all due to the larger front end and the thick baseplate beneath it, and 3/4” wider, due to the offset ND filter wheel housing at the front of the camera.
What does this added bulk buy you over the FS100? The short list:
- Super Slo-Mo: 120 & 240fps at full res, 480fps with reduced vertical resolution; 960fps windowed down 2x with half the vertical res of 480fps.
- Three built-in ND filters.
- PMW-EX1/EX3/F3-style cine gammas (this is huge).
- HD-SDI output.
- A vastly-improved side grip.
- The possibility of some sort of 4K raw output (!) in the future.
Design
Left Side

Left side: lens, exposure, and operational controls.
At the very front of the camera there’s a four-position slide switch for the built-in ND filters. Aft of that, there are iris controls (useful for E-mount lenses, Alpha-mount lenses on the LA-EA2 adapter, or Canon lenses on the Metabones adapter): a momentary PUSH AUTO button, a dial for manual iris selection, and an IRIS button to select auto or manual modes. Focus controls are provided (again, for E-mount or Alpha-mount lenses); a momentary pushbutton and a slide switch for auto/manual focus. The pushbutton provides autofocus in manual mode, and holds the current focus in autofocus mode, a nice touch.There’s a big, ribbed metal ring coupling the camera section to the recorder section. It looks like the World’s Biggest Focus Gear, but it doesn’t turn; it appears to be a heatsink/radiator. At its base, nestled away from fumbling fingers, is a HOLD slide switch. It can be set to lock all the controls, everything other than record start/stop and PHOTO buttons, or everything aside from start/stop, PHOTO, and camera-mode controls.
On the recorder section there are two rows of three assignable buttons, labeled 1-6 in bright white. Default functions are shown in darker gray, and the defaults are mostly sensible, so you may not need to change them except in unusual conditions. The one probable exception is FACE DETECTION, an auto-face-finding focus mode only usable with E-mount (and possibly some Alpha-mount) lenses; if you’re not using a compatible lens, changing #3 to something more useful is easily done (I picked EXPANDED FOCUS for my tests, and was well pleased).
[Yes, the default buttons for ZEBRA and PEAKING are swapped compared to their placement on the FS100. The rationale behind the swap is a mystery. Shooters with both cameras can, of course, reprogram one camera to match the other, but relabeling the buttons with scraps of sticky tape is an inelegant solution to an inconsistency that shouldn’t exist in the first place.]
Three oblong buttons toggle manual control of gain, white balance, and shutter. Below these are a pushbutton to invoke S&Q (Slow and Quick, or variable-speed) recording, which can be set to S&Q, Super Slow Motion, or both; a three-position gain switch; a three-position white-balance switch (A/B/PRESET); a white-balance-setting pushbutton; and a multi-purpose thumbwheel. The thumbwheel sets shutter speeds, frame rates, auto-exposure adjustments, and traverses menus, depending on which button was last pressed.
Above the SONY logo there’s a slot for threading a carrying strap. Below the logo, a slide switch toggles the camera’s general operation between fully AUTO and selectable MANUAL controls. MENU displays the camera’s menus, while PICTURE PROFILE brings up a selection of six picture profiles (custom presets) letting you fine-tune image parameters like gamma, matrix, detail, and knee. A DISPLAY button toggles the data readouts on the LCD (and the output connections, if you’ve configured the camera to do so), while the STATUS CHECK button cycles through a set of LCD overlays with detailed information on the camera’s status and configuration.
At the very bottom there’s a push-in BATTery RELEASE button, and at the back, there’s a flip-open door for the MS/SDHC card slot, with a card-access LED above it. The LED glows red when the card is being written to or read from: a stoplight letting you know when it’s not safe to pop the card out.
Rear

Rear view with LCD upright and side grip cable plugged in.
At the upper left there’s a narrow window for the IR remote control, with a tally-lamp LED embedded in it. A channel-selection switch for the headphones lets you choose Ch. 1, Ch. 2, or a stereo mix; it sits beside the 1/8” / 3.5mm stereo headphone jack, which lurks behind a tethered rubber cap. Also on the same tether is a cap over the REMOTE jack, a LANC port compatible with the full-featured RM-1000BP controller, though more normally used for the handgrip’s control cable.Just above the cavernous battery well, a 3G HD-SDI output replaces the FS100’s mike input 2, behind a flip-out rubber cap on the left. On the right, a flip-up door reveals a full-sized HDMI port.

Rear view with LCD closed and most doors/caps open. Sorry ‘bout the gaffer tape.
On the left, again, we see the card slot door; on the right another door hides RCAs for composite video and stereo audio output, as well as a Sony-proprietary D-shell jack for an analog component video cable, included, which terminates in three RCA plugs.You’ll note that the mike holder appears to be sagging a bit. It’s unsightly, but not problematic; the mike holder (as we’ll see) can rotate a bit in its shoe mount, and the lateral arm can sag slightly as it’s carried in a rubber shock-absorbing sleeve.
Right Side

Right side view with mike holder in top shoe mount.
The right side has another carrying-strap lug, and a cable clip for wrangling the cables from the included microphone and the removable handgrip. XLR input 1 has its own rubber cover, as does the USB port below it. The rotating handgrip attaches up front on an Arri-style rosette. At the bottom rear there’s a DC power port behind another flip-open rubber cover.
Right side, grip removed and port covers open or removed. Sorry ‘bout the gaffer tape.
The bulk of the right side is occupied by a pop-out blank. Flip its release lever forwards and pop the blank out, and you can pop in the same HXR-FMU128 memory unit used on the Hand on the FS100XR-NX5 .XLR Input 2 sits just inboard of the handgrip mount. The front of the recorder has two pushbuttons, a PHOTO trigger and a START/STOP trigger. They’re somewhat hard to locate by touch with the grip removed, and well-nigh impossible to get to with the grip in place—but as they’re replicated on the handgrip itself, that’s not really an issue.
Top

Top view: the LCD can be flipped around and folded flat for top-down viewing.
It’s clear from this view how far off to the side the handgrip is; it’s pushed out to the right by the need to clear the offset filter wheel housing.The top of the camera has two 1/4” mounting sockets up front and two just ahead of the LCD; these provide secure attachment points for (a) the supplied carrying handle or (b) third-party top mounts and cheese plates. Because the front half of the camera is both longer and taller than the corresponding part of the NEX-FS100, existing FS100 bolt-ons won’t work, but rest assured folks like Solid Camera and Shooting Machine are developing FS700-specific accessories as I write this.
The camera’s LCD sits amidships on a tilt-and-swivel mount. A thumbwheel to its right adjusts tilt friction, necessary when using the long and heavy viewfinder tube.

Top front: focus hook, mode selector, input 2, and two 1/4” mounting sockets.
A focus hook at the “film plane” lets you attach a tape measure when using cine-style lenses. XLR 2 is conveniently placed to connect an on-camera mike, and a top-mounted mode selector lets you toggle the FS700 from motion picture recording to stills-capture mode.Top rear: audio, playback, and menu controls.
The rear half of the top has an inset well for the folded-down LCD; this well is chock-full of controls.Along the left side are the usual audio controls: LINE/MIC/+48v selectors for both XLRs; input-to-channel routing switches, AUTO/MANual gain switches, and rotary controls for audio level.
Two rows of transport-control and data-display buttons fill the top right. Below that, there’s a four-way rocker for menu navigation with a center EXECute pushbutton. Two important buttons sit to its right, VISUAL INDEX and MENU. VISUAL INDEX is the button you push to toggle between “camera” and “playback” modes. MENU is a second menu button, handily placed so that if you’re involved in playback operations, you needn’t detour to the side of the camera to call up the menus.
At the rear edge, alongside the audio pots, there’s the master power switch (with a green pushbutton lock to reduce inadvertent actuation), a START/STOP trigger, and a headphone volume rocker switch. This entire row of important-while-shooting controls is accessible even with the LCD folded down.
Bottom

Underneath, there are two 1/4” and six 3.8” mounting sockets.
The camera has plenty of mounting points on its baseplate (and, unlike some of the sockets on the FS100, all of them are deep enough to accommodate almost any common tripod or baseplate screw).Notice, at the very rear of the recorder section, the two small, oblong rubber feet. On the FS100, these served a purpose; on the FS700 with its thicker baseplate, these two feet dangle up in the air: useless appendages left behind in the evolution of the FS100 to the FS700—evidence of common ancestry, and of common parts used for both cameras!
Front
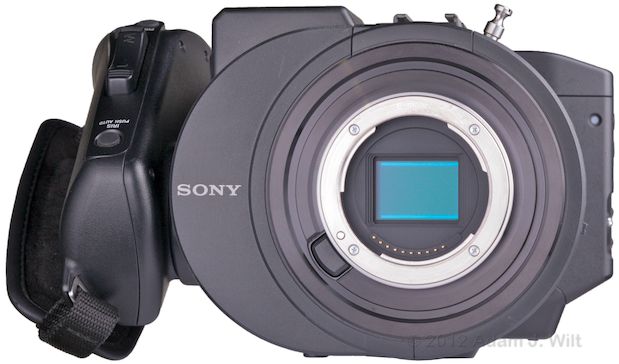
The FS700’s sensor resides behind an offset ND filter wheel.
The camera’s front is dominated by the immense offset filter wheel housing for the camera’s three ND filters, a housing not unlike that of the filters and mechanical shutter on the F65.The lens release is on the lower left edge of the lens mount. There’s a red tally LED at the upper right corner of the recorder section.
Display
The camera’s single display is a 3.5” (8.8cm) LCD, mounted atop the camera on a tilt-and-swivel pivot. The LCD can be spun completely around to face forwards; spun 90 degrees in the other direction to face the right side of the camera; flipped up 150 degrees for low-angle viewing, or spun around and folded flat for looking straight down at, like the groundglass on a Hasselblad. It can also be folded flat, face-down, for protection during transportation.
The LCD resolves about 400 TVl/ph horizontally, maybe 500 lines vertically (put another way, details on a resolution chart can be seen to those limits, inclusive of aliasing). It is bright, contrasty, and perfectly usable outdoors, even in direct sunlight.
EXPANDED FOCUS magnifies the LCD image 4 times or 8 times, and the magnified view can be moved around the image using the four-way rocker. Expanded focus can be used while recording. There’s also digital peaking available, in white, red, or yellow (but not green or blue), with three levels of edge sensitivity. Peaking and expanded focus can be used together. It’s fast and easy to set or check focus using these aids; the high magnification that expanded focus allows on the FS700 is of great benefit given the sensitivity of large-sensor cameras to focus errors.
The FS700 offers typically comprehensive Sony data readouts and status displays:
LCD with all data displays, zebra, and focus-in-red indicators. Shutter speed is selected for manual control.
With all data displays enabled, you can see battery charge in percent; record status and destination (here, it’s the SD card; it could also be the flash memory unit); timecode or user bits; zoom setting (with an E-mount lens, that is), time remaining on the current medium at the current borate; recording format; zebra setting; whether or not peaking is engaged; histogram (with a yellow line at the current peaking setting); steadyshot setting (when using a compatible optical-steady-shot lens); audio settings and levels (showing manual control of both channels); manual focusing indicator; picture profile setting; f/stop (with compatible lens), ISO or gain setting (user-selectable); shutter speed or angle; white-balance setting.As on the FS100, the histogram shows both the superwhite area above 100% (the bit to the far right; it has a darker background, though that isn’t visible in this picture) and the current zebra setting (the yellow line). The zebra-level line remains on the histogram whether zebra is being used or not, though it can be turned off in the menus if you find it distracting. There’s only one small inconsistency; while the zebra can be set at any 5% interval from 70% to 100%, or for “100%+”, the histogram shows the 100%+ zebra setting in the same place as the 100% zebra, making the line less useful as a current-setting indicator.
While the histogram obeys the DISPLAY button, it can also be toggled independently (subject to the overall DISPLAY mode) with its own button, as can the zebra and peaking displays (by default, assignable buttons 2, 4, and 1 respectively).
With all that gumpf shown, pushing the DISPLAY button removes all the clutter from the top half of the screen (aside from the recording status), leaving only shooting-related controls visible.
LCD with all displays off; only recording status remains.
Push the DISPLAY button again, and all overlays vanish, save for the recording status indicator.As on the FS100, LCD markers have their own button. Markers include a center cross, a rule-of-thirds grid, and a variety of aspect-ratio (4:3, 13:9, 14:9, 15:9, 1.66:1, 1.85:1, 2.35:1) and safety-area (80%, 90%) settings. Also as on the FS100, turning on markers makes all data displays aside from timecode disappear from the video outputs, if those outputs have data displays enabled—though the markers themselves aren’t displayed on the video outputs.
The FS700 offers six pages of status display using the STATUS CHECK button, and the same style of menus as on the FS100 (see the FS100 review for samples of comparable displays—though the FS700 does not have the GPS that the FS100 does).
“Visual Index” mode, scrolling through clips.
Pressing VISUAL INDEX switches from camera mode to playback mode, displaying a, well, visual index of clip thumbnails. The currently-selected clip’s metadata is shown below the thumbnail array. This screen, like all the playback screens, is navigable by touch (yes, it’s a touchscreen) as well as with the four-way rocker.Picking clips for deletion. Note the regrettable lack of metadata display.
Unfortunately, when you tell the camera that you want to delete clips, the metadata display is sacrificed in favor of another row of thumbnails. Yes, it’s nice to see more clips without scrolling; however, you have to memorize thumbnails before switching to delete-picking mode, because there’s no way to see more info about a clip when you’re about to delete it!Playback mode, all onscreen (touch-sensitive) controls shown.
In playback, you get a full complement of touch-sensitive onscreen controls, as well as shooting data. In this example, I had a Nikon prime attached, so there’s no aperture, zoom, or focus readout, but if I’d used a compatible Sony lens, those readouts would appear.Playback screen, all controls hidden.
And again, pressing DISPLAY hides all that gumpf, leaving just the picture.Top Handle, Mike Mount, and Handgrip

The top handle is securely attached with two long, strong screws.
The camera’s cast metal top handle slides into the camera’s accessory shoe and bolts down using two substantial screws. Once affixed in this manner, it feels like a continuation of the camera itself: it doesn’t flex or wobble in the slightest, and provides a comfortingly solid grip.Accessory shoes on the front and top allow the mike mount to be easily attached. Cable clips on either side at the rear let the mike cable be secured out of the way.

The top handle has two 3/8” and two 1/4” mounting sockets. Hole pattern at rear allows shoe to be relocated.
Four threaded mounting sockets allow for top-mounted accessories (like an articulated arm for a separate EVF, nudge nudge), and the top accessory shoe can be relocated to the aft end of the handle if so desired.
The mike mount fits in either the top or front shoe, and flips open for lateral adjustments.
The supplied ECM-XM1 electret condenser mike clips into a quick-release shockmount. The shockmount’s lateral arm can be adjusted side-to-side and rotated in place in its rubber bushing by flipping up the front of its holder; the holder itself slots into either accessory shoe (or any other standard shoe, including the one the top handle normally attaches to) and clamps in place with a knurled wheel.The side grip has a START/STOP trigger on it, along with a zoom rocker on top (which doesn’t do anything; it’s “for future function enhancement”), PHOTO and EXPANDED FOCUS buttons at the top rear, and an IRIS PUSH AUTO button at the top front, just like the one on an ENG lens grip. The IRIS button replicates the one on the camera’s left side; it functions with E-Mount and Alpha-mount lenses with the LA-EA2 adapter.
The grip screws into a 1/4” socket surrounded by an Arri-style rosette. The attachment screw uses a dual-winged plastic knob; on my demo camera it had been damaged, and no longer firmly held the attachment screw itself, but the rosette mount was so good at preventing rotation when the knob was even lightly tightened that I was able to quickly and easily adjust the grip and clamp it in place with minimal fuss and bother.

Demo camera’s side grip knob was broken, yet it still tightened securely.
Viewfinder Tube; 18-200mm lens
The viewfinder tube and 18-200mm kit lens are exactly the same as those supplied with the FS100; I’ll replicate their descriptions here, but if you want to see images, please refer to the FS100 review.
The camera is supplied with a “viewfinder tube” converting the LCD to an EVF of sorts. It clips onto the LCD with two spring clips, and extends about 7.5” back, with an adjustable eyepiece lens and a rubber eyecup. The tube provides a big, eye-filling image, large enough to see fine detail but not so large that your eye can’t take in the whole scene for composition. It’s just slightly smaller than the scene presented by the Panasonic DMC-GH2’s EVF (one of the best EVFs available); it’s equivalent to the view of a 42” monitor from 6 feet away.
The tube has a flip-up hinge allowing it to be opened, so that the LCD can be viewed from a distance without removing the tube. The chunk of the tube attached to the LCD acts as a hood, shielding the LCD from incident light; while the LCD itself is daylight viewable (and one of the best and brightest I’ve used in full sunlight), using the tube as a hood is helpful when shooting outdoors.
The SEL18200 zoom lens supplied with the FS700UK package is an 11:1 kit lens designed for Sony’s NEX line of compact system still cameras. It has 67mm filter threads and a “petal” style lens hood. The lens body is finished in bright, polished aluminum, with black rubber zoom and focus rings. (There’s an all-black version of the 18-200mm that’s supposed to be shipping Real Soon Now; I don’t know if that black version of the lens will be offered in an FS700 kit or not.)
The lens ranges from 18mm to 200mm; in 35mm still camera terms that’s the equivalent of 28.8mm to 320mm. In 35mm cine camera terms, well, it’s an 18-200mm zoom!
The zoom is a directly-coupled mechanical zoom; it’s most compact at 18mm, and extends considerably at 200mm, doubling the length of the lens.
It has a LOCK switch to keep it at 18mm; superzooms of this sort, carried lens-down on still cameras, have a tendency to self-extend. The zoom turns in the “wrong” direction, like the zoom on a Nikon lens; it’s the reverse of the normal direction for cine and video lenses. It has a short throw of about 90 degrees, and focal lengths are marked on the barrel in white.
The focus control is a free-spinning servo ring, with rate-sensitive gain: turn it slowly and it’ll take at least 180 degrees of travel to focus from 0.3m to infinity. Turn it quickly, and that same focal range is traversed in 90 degrees or less. The focus ring turns in the right direction, the same as cine and video lenses. The ring is entirely inoperative in autofocus mode; there’s no ability to just grab it and reset focus as many fixed-lens camcorders allow.
There are, for obvious reasons, no focal-distance markings on the lens itself, but there is a distance readout on the LCD when the lens is being manually focused, though only within three seconds of actual focusing activity. The readout is in tenths of meters out to 10m, then in whole meters.
There’s no aperture control on the lens; the body-mounted IRIS control is used instead. The lens incorporates Sony’s OSS (Optical SteadyShot), similarly controlled using the camera’s menus. This lens offers both normal and “active” SteadyShot; the latter has a more tranquilizing effect on the image, more like the strong optical stabilization in many of Canon’s camcorders.